
Photography is the study of light. In that study of light, it’s our job to capture and create the best light possible. With off-camera flash we can make an image look any way we want. Our flash photography tips are crafted to help you make your best photos ever!

-
Get creative with placement. Everyone does the shot with the flash off to one side about 5-10 feet. It looks great and works, but then again, shooting like everyone else will never make your work standout. Experiment with new placements to create your own signature shooting style that is recognizable.
- Just because you have flash is off camera, doesn’t mean you shouldn’t also have one on-camera! Use the on-camera flash as a bit of fill to even the photo out. It should be less powered and stopped down from your main light, just enough to illuminate dark patches a little bit so they aren’t pure black.
- Mix it up with gels that aren’t meant for that lighting. Sometimes changing the color of your flash will have a very cool effect. There’s a certain look that Sports illustrated uses where they put warm gels on the flash and set the camera white balance to cold while outside. This makes the sky dark blue during dusk and dawn and illuminates the subject in a warm natural light. Try mixing gels and white balance settings to create your own look.
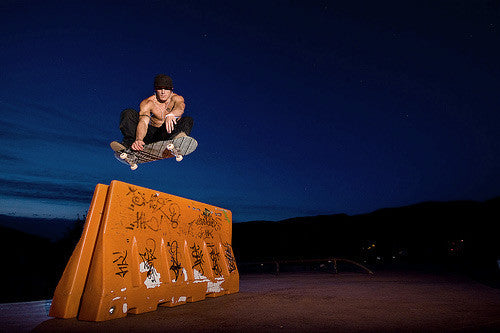
Image captured by Daniel Milchev
- Remember all 3 dimensions when you place your flash. It doesn’t have to be at eye level. Think about height as well to really change the style of lighting.
- Turn your flash on full manual. TTL is great but very controlled even within the full bracketing range. If you want one flash that’s truly full power, turn that one on manual and make sure it’s at full power.
- Use the zoom on your flash head. If you are bouncing the light off a wide wall, set it wide open. If you are set up from a distance and don’t want the light spread everywhere, zoom it in to where you need it set.
- Multiple flashes? No problem. Build up your shot one flash at a time. It’s easy this way to see what each flash adds/detracts from the image and adjust accordingly. When you set all your flashes at once and start shooting it can be really difficult to isolate any problems that pop up.

Image Captured by Michael Alvarez
- You don’t have to buy the flash brand that matches your camera… This can help you save some money getting started and let you purchase multiple flashes. There’s lots of third-party manual flashes that are far more affordable and produce results that are just as good. Check out LumoPro’s line.
- Put a diffuser on your flash! That’s our main focus here at LumiQuest. Diffusers make the harsh light much smoother to achieve a professional and clean image. Harsh shadows take away from an image (unless you are going for a super dramatic harsh look!)
- Save yourself time and money and pick up rechargeable batteries for your flashes. The prices seem steep at first but after you use flash a few times and drain through several sets of batteries you’ll realize how much cheaper this option is over time. Rechargeable batteries also typically have a longer and stronger charge so you’ll get more full power flash pops with each set.
Sanyo Eneloop Rechargeable Batteries
- Be subtle when you work with flash outside. It’s easy to get into that ultra strong flash mindset because you want everyone to know you work with flash. But the best outside photos use flash to fill and work with the sunlight. If you try to fight the sunlight it’s tougher to shoot and the results won’t look natural and clean.
- Like every new technique you learn and try, flash photography can easily be overused. Remember that sometimes the best shots have no flash at all. And even more importantly, are actually captured. If you find you are playing around with your flash and missing shots because of it, go natural for a few. It’s better to have one shot that’s not perfect, than no quality shots at all!
- Use the surfaces around you when you can. If there’s a big white wall or ceiling nearby you can point your flash and use it as a bounce surface. This essentially makes that surface the new flash source and because it’s so much larger it will make your lighting very soft and even. Just remember that if the surface is not pure white the color will carry into the shot and change the whole look.
- Don’t use a flash diffuser that spreads the light in every direction when there are no walls and surfaces to bounce off. By doing this you are wasting flash power and won’t have softer light. Countless times at weddings and events we will see photographers with a large 360 degree flash modifier and no surfaces for the flash to bounce. Take it off in this situation and use a modifier that’s directed towards the subject and that truly enlarges the light source for real results.
- Know your camera’s shutter limitation for flash photography. If it’s 1/250 then it’s typically best to stay at that setting. Above there the flash can go into Auto FP mode for faster flash syncing but will lose a lot of power. In daylight it usually loses so much that it won’t illuminate the subject at all. Look at this article on hypersync by PocketWizard if you plan on shooting action with flash in broad daylight.
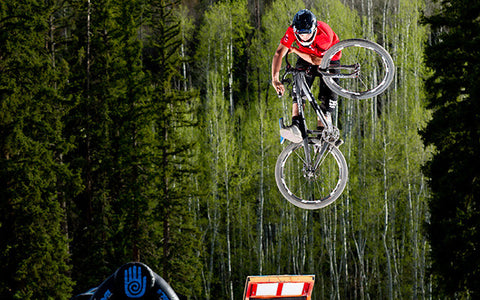
Image Captured by Connor Walberg
- Shutter speed DOES NOT affect your flash exposure. Aside from going above your camera’s limit, if you stop down the shutter speed than your lighting from flash will still look the same. Think of it like two separate exposures. The flash exposes it’s respective parts of the image, and the shutter speed controls the ambient light.
- Aperture DOES affect your flash exposure. Stop it down and you’ll see less flash output and vice-versa. If you change aperture however, you’re ambient will be affected and you’ll need to change your shutter speed or ISO to even that back out. It also changes your depth of field for the shot so keep that in mind.


The most important tip of all for better flash photography? Experiment and learn how everything works together. If you don't understand how settings work together it's tough to make consistently amazing images. Also, we recommend learning with friends and family instead of on the job, it will make each shoot go that much smoother!
Please let us know how these tips help you and if you have any other questions in the comments below!